Open Chrome, Firefox and Edge in Incognito Mode by Default
First introduced in Apple Safari as 'Private Mode' more than a decade ago, the Incognito feature has since attained immense popularity among netizens. It has since been adopted by Google, Mozilla, Microsoft, and other browser-makers for their respective web browsers. So in this article, we will show you multiple ways to open Google Chrome, Mozilla Firefox and Microsoft Edge Chromium in Incognito (or private) mode by default in Windows 10.
[custom_toc_area]
Start Incognito Session in Any Web-Browser
The easiest way to start an Incognito session in any browser, including Google Chrome, Mozilla Firefox and Microsoft Edge Chromium, is through its Taskbar shortcut. For that, first pin that app's shortcut to the Taskbar if it isn't there already. Then right-click on it and select New Incognito Window in case of Chrome, New Private Window for Firefox and New InPrivate Window in Edge Chromium.
Always Open Google Chrome in Incognito Mode
Note: You need to be logged in as administrator on your Windows 10 computer to be able to make the following trick(s) work.
Method 1: By Modifying Target Path in Desktop Shortcut
- Firstly, check if you have a desktop shortcut for Chrome. If you do, skip this step and go to step 2. Else, create a shortcut by navigating to the Chrome installation folder and then right-clicking on the executable file (chrome.exe) > Send to > Desktop (create shortcut).
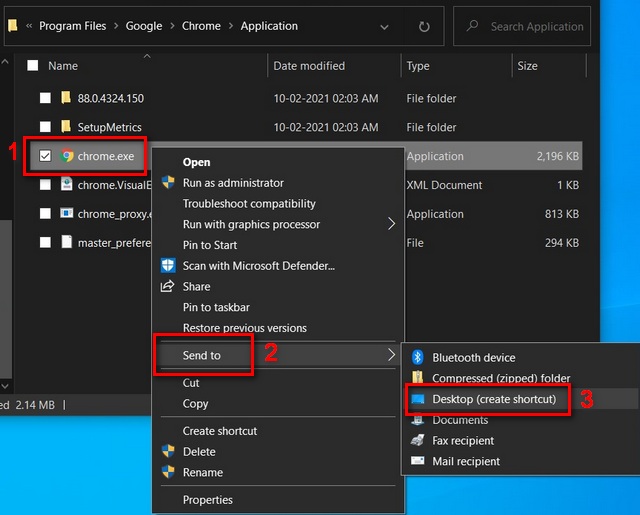
Note: By default, the installation folder for the 64-bit application will be C:\Program Files\Google\Chrome\Application (64-bit). For 32-bit, select Program Files (x86) at the first step.
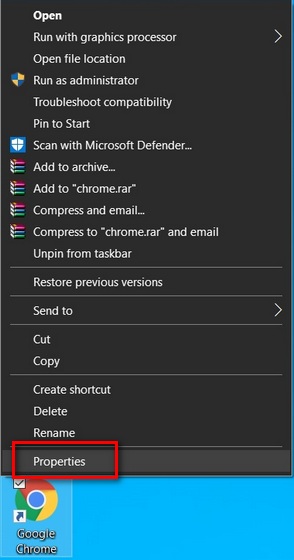
- Right click on the Chrome shortcut icon on your desktop and go to Properties.
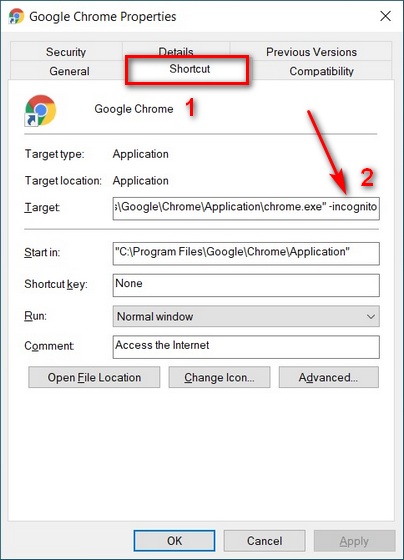
- In the Properties window, move to the Shortcut tab [1] and locate the Target box. Then add " –incognito" (without quotes; also include a space before the hyphen) at the end of the existing path and click on OK. Confirm when asked for admin permission.
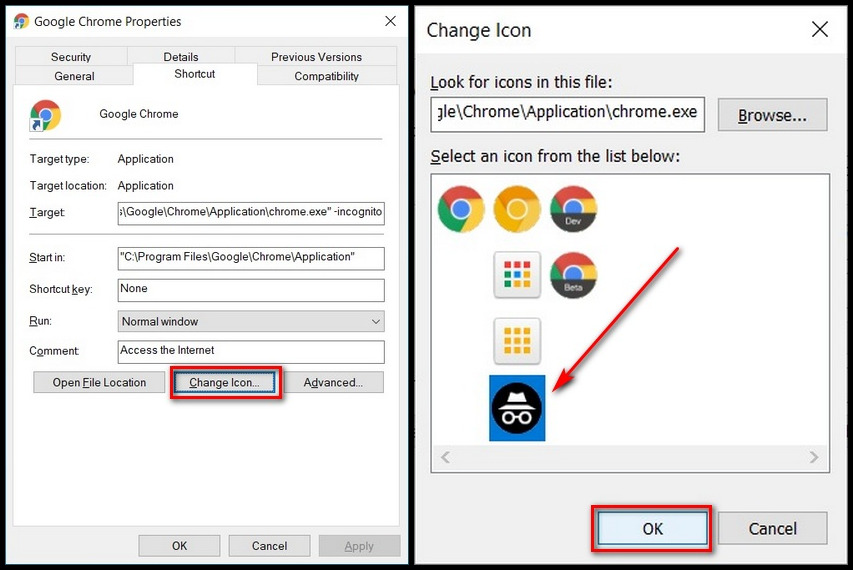
- You can also change the Chrome shortcut icon to Google's Incognito icon by clicking on the Change Icon button and selecting the incognito icon from the available options.
Method 2: By Using Windows Registry (Regedit)
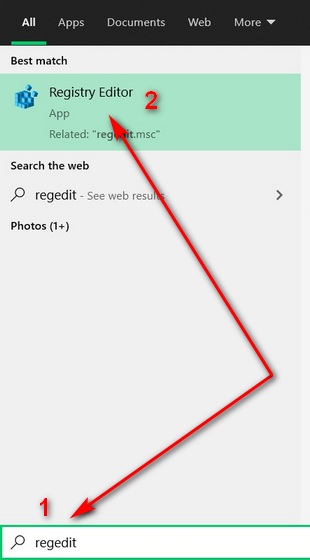
- Open the Windows Registry Editor. For that, search for “regedit” in the Windows Search Bar and click on the first result.
- Now navigate to
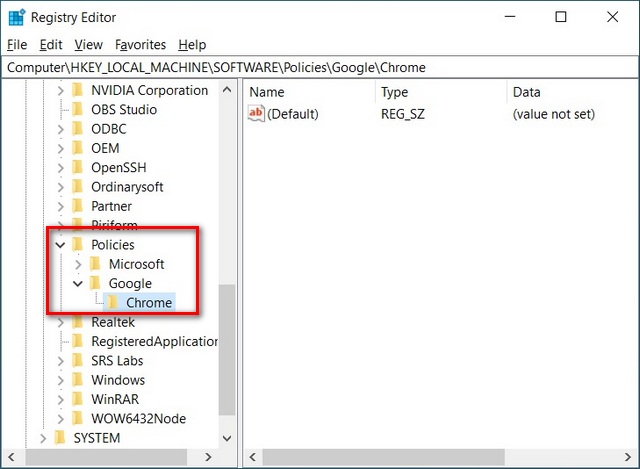
Computer > HKEY_LOCAL_MACHINE > SOFTWARE > Policiesusing the left pane. If you see a folder called 'Google' then skip this step. Otherwise, manually create the folder by right-clicking on Policies > New > Key. Name the new entry Google.

- Now right-click on the newly-created Google folder and create another key and name it Chrome. The final hierarchy should be “Policies > Google > Chrome” as seen below.
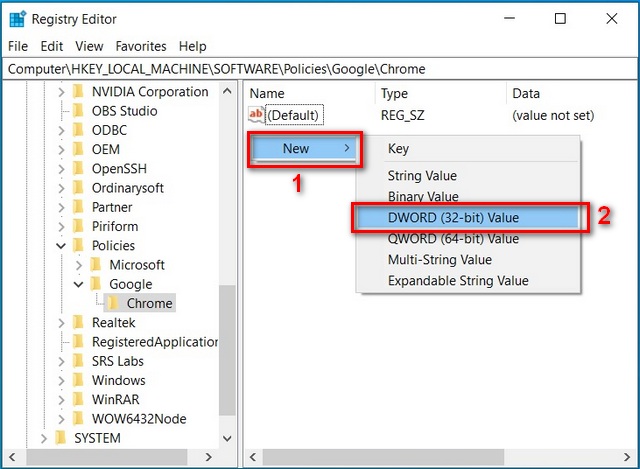
- Now select the new Chrome folder. Then right-click on the empty right pane, and choose New > DWORD (32-bit) Value.
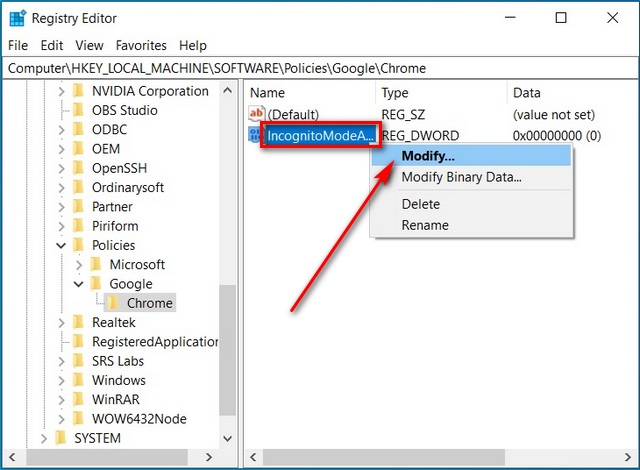
- Name the new entry IncognitoModeAvailability and then right-click on it and select Modify.
- Assign the hexadecimal value "2" (without quotes) and click on OK to save your setting. Restart Chrome to implement the change.
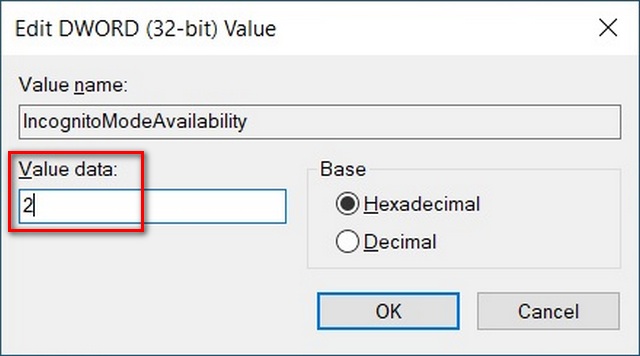
From now on, every time you open Chrome from anywhere on your computer, you will get an Incognito window irrespective of whether you choose Incognito or not. To revert, simply modify the “IncognitoModeAvailability” value to 0 or delete it altogether.
Open Mozilla Firefox in Private Mode by Default
To always start Mozilla Firefox in Private Mode, follow the simple steps detailed below:
Method 1: Using Desktop Shortcut
This method is similar to Method 1 for Chrome. Here we will change the target path for the Firefox shortcut to ensure that the browser will open in private mode every time.
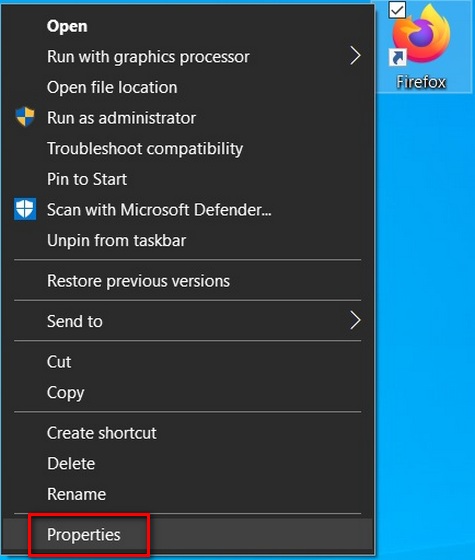
- Create the Firefox desktop shortcut if it isn't there already by following the Chrome tutorial above. Then right-click on it and select Properties.
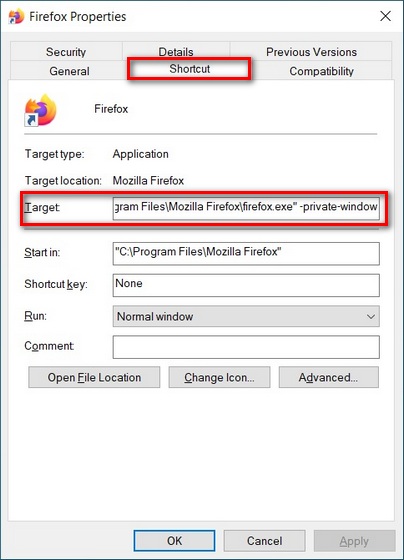
- Next, move to the Shortcut tab and and add " - private-window" (without quotes; use a space before the first hyphen) at the end of the default target path. Click on OK and provide admin permission if asked.
Method 2: Using In-app Settings
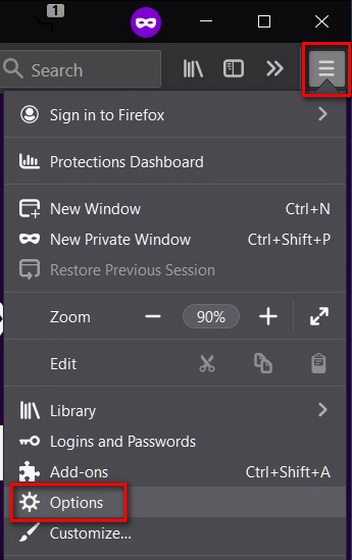
- To access Firefox settings. click on the hamburger menu (three parallel lines) at the top-right corner of an open Firefox window and select Options.
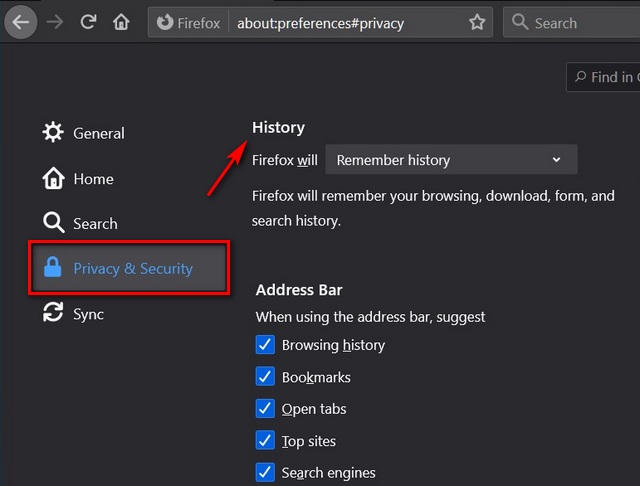
- Now select Privacy and Security on the left pane, and scroll down to the History section on the right pane.
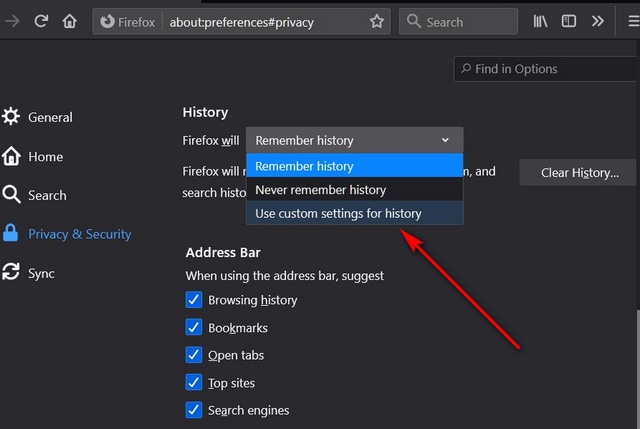
- Use the drop-down menu to select 'Use custom settings for history'.
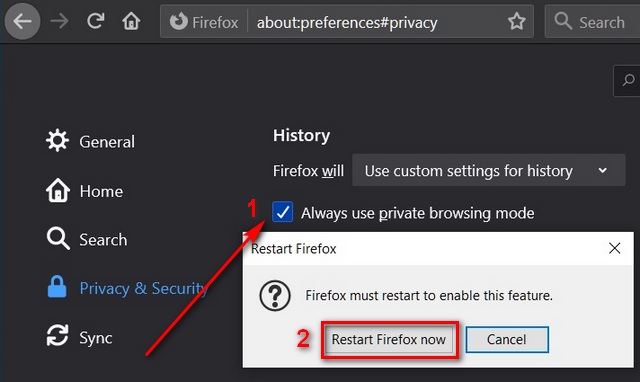
- Now check the box next to 'Always Use Private Browsing Mode'. Once you restart, Firefox will always start in private browsing mode.
Open Microsoft Edge Chromium in InPrivate Mode by Default
To launch Microsoft Edge Chromium in Private Mode every time, follow the same process as described in Method 1 for both Chrome and Firefox.
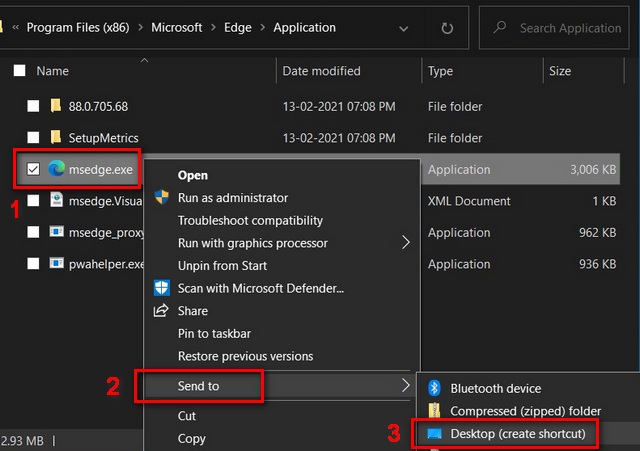
- If there's no Edge Chromium shortcut on the desktop, create one by going to C:\Program Files (x86)\Microsoft\Edge\Application and then right-clicking on msedge.exe > Send to > Desktop (create shortcut).
- Now right-click on the Edge Chromium shortcut and select Properties.
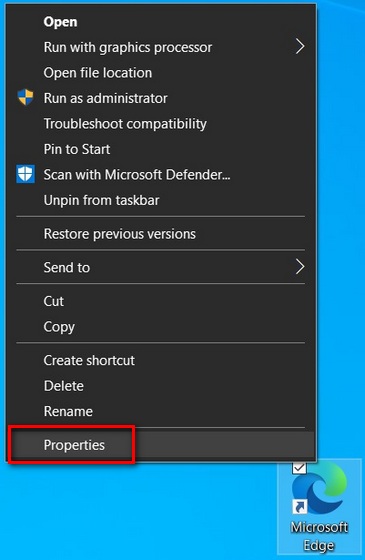
- In Properties > Shortcut, add " - inprivate" (without quotes; use a space before the hyphen) at the end of the default target path. Click on OK and provide admin permission if asked.
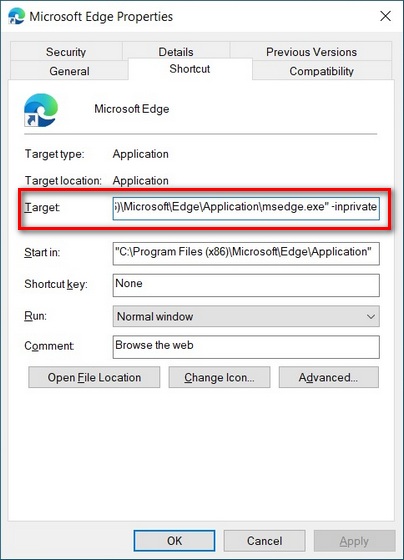
That's it. Microsoft Edge Chromium will now open in InPrivate (private or incognito) mode every time it is started.
Open Browsers in Private Mode to Enhance Your Online Privacy
Do note that in case you use method number 1 for Chrome and Firefox, the browsers will open in incognito/private mode only when started from the shortcut with modified target path. You can revert the changes by deleting the addendums at the end in the 'Target' box. If you don't want to use the incognito mode by default on your browser, you can still maintain privacy by deleting browsing history on Chrome, Firefox and Edge Chromium.
As for the Incognito mode, it is available not only on web browsers, but also in most of Google's online services and apps, including Maps, YouTube and more. You can enable it in Google Maps and on YouTube by following our step-by-step tutorials. To further enhance your online privacy, you can also check out our guide on how to fake geo-location in your browser and how to disable location tracking on Windows 10.


0 Comments